How to make coffee filter rose, FREE template
This is the free step-by-step tutorial and template to make a coffee filter rose. It’s so easy and so realistic.
It’s perfect for your personalized gift.
Could you make a rose out of coffee filter paper?
Contents
Absolutely yes, just follow our tutorial and get our free rose template at the bottom of this post.
As a paper flower maker with 8 years of experience, I have to confess that I really love the textures of the coffee filter. But it’s kind of thin and should be appropriated for a paper-wide rose.
When I touch the coffee filter, I think this paper is the closest match to the real flower petals in terms of texture.
Here are some of the techniques that can be used to apply watercolor to coffee filter rose:
- Dipping: This is the simplest technique. Simply dip the coffee filter in water and then apply the watercolor.
- Brushing: This technique allows for more control over the application of the watercolor. Use a brush to apply the watercolor to the coffee filter.
- Spraying: This technique is a good way to create a soft, diffused effect. Use a spray bottle to apply the watercolor to the coffee filter.
- Rubbing: This technique is a good way to create texture. Use a sponge or a piece of cloth to rub the watercolor onto the coffee filter.
Experiment with different techniques to find the one that works best for you.
Video tutorial to make coffee filter rose:
Materials to make coffee paper roses:
(This post might contain affiliate links)
- Coffee filter paper (This type of paper is white and large enough for your rose size)
- Watercolor or marker
- Green paper color (optional as you could easily color the printer paper or coffee filter itself)
- Floral tape
- Tissue paper
- 20w glue gun
- Scissors
- White glue
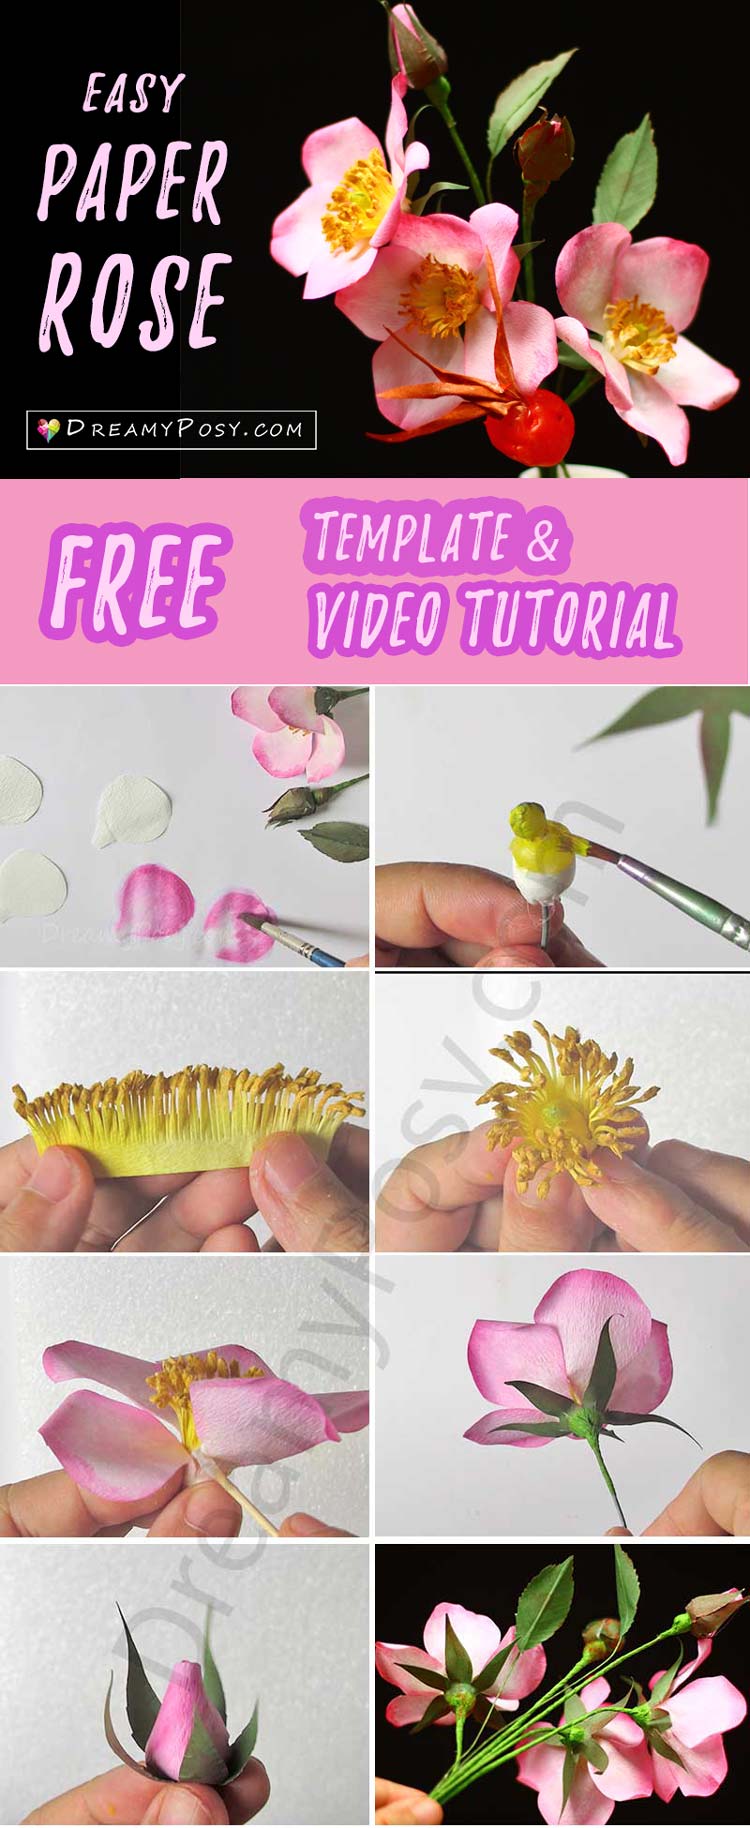
Step-by-step instructions to make a coffee filter rose:
- Grab the coffee filter paper and other materials and my FREE template. As you could see that I have tried many different types of paper. You could use printer paper and pastel chalk instead. I found that coffee filter and watercolor has the best effect.
- Color the fashion sketch picture with watercolor, pencil, or comic marker, any kind you are comfortable with.
For the flower
- Cut the petal along the template.
- For blending the petal, use clean water to wet first. Then use diluted pink color for the first layer. Use the non-diluted pink at to top of the petal and use clean water to blend it with the previous layer.
- Use a wire gauge 20 with a head, wrap a small strip of tissue paper to shape the stamen, and use a hot glue gun to cover it all.
- Cover the stamen with yellow acrylic color, or yellow watercolor mix with white glue.
- Cut a 5cmx3cm rectangle of the coffee filter, color, glue, and cut as an eyelash as the video instructed.
- Glue the eyelash with the stamen, then the petals with the stamen.
- Glue the sepal with the flower
- Wrap the floral tape at the sepal
For the bud
- Cut the petal and color them as the flower petals
- Use the tissue paper to wrap up a bud shape
- Attach the petal with the tissue paper shape with white glue
- Use the round stylus to shape the sepal
- Glue the sepal with the bud and wrap with floral tape
For the rose hips:
- I’m not happy with this way to make rose hips, so I decided not to post it.
- But you could use the easy and simple cold porcelain recipe that I’ve shared in step 4 of the paper Hibiscus tutorial here to make it and color it with nail polish.
I love doing these simple crafts from my heart, and I would like to share them all with you for FREE.
Please support me by not sharing our template directly, please just share
See more >> Tissue paper roses tutorials
Thank you and love you all,
Ann

Pingback: Fashion Illustration with Pansy flower tutorial, FREE template